25 February 2014

Writing the Date in English

Writing the Date

There are several different ways to write the date in English. They vary from formal to informal, and there are differences between British and American English. The following table shows some typical formats.

FormatBritish: Day-Month-YearAmerican: Month-Day-Year
Athe Fourteenth of March, 2011March the Fourteenth, 2011
B14th March 2011March 14th, 2011
C14 March 2011March 14, 2011
D14/3/20113/14/2011
E14/3/113/14/11
F14/03/1103/14/11

Note: which format to use is a question of formality, politeness and personal choice. Generally, the longer formats, such as B or C, are more polite (since they show more respect for the reader). Shorter formats, such as D or E, are used in less formal situations, for example a memo, a letter between friends or an impersonal business letter. Format F is rather official and is typically seen on an invoice or an official or technical document. Format A is extremely formal and mainly used on printed items, for example a wedding invitation. The numerical formats may use a full stop (.) or hyphen (-) instead of a slash (/), for example: 14.3.2011 or 03-14-11

TIP

Note that another format exists which writes the date numerically in the order Year-Month-Day, for example: 2011/03/14. This is rare in British or American English and used mainly in very official or technical documents.
Months
NumberNameAbbreviations
1JanuaryJanJ
2FebruaryFebF
3MarchMarM
4AprilAprA
5MayMayM
6JuneJunJ
7JulyJulJ
8AugustAugA
9SeptemberSepS
10OctoberOctO
11NovemberNovN
12DecemberDecD
In English, months are correctly written with an initial capital: January, February...
Days of the Month
1stfirst
2ndsecond
3rdthird
4thfourth
5thfifth
6thsixth
7thseventh
8theighth
9thninth
10thtenth
11theleventh
12thtwelfth
13ththirteenth
14thfourteenth
15thfifteenth
16thsixteenth
17thseventeenth
18theighteenth
19thnineteenth
20thtwentieth
21sttwenty-first
22ndtwenty-second
23rdtwenty-third
24thtwenty-fourth
25thtwenty-fifth
26thtwenty-sixth
27thtwenty-seventh
28thtwenty-eighth
29thtwenty-ninth
30ththirtieth
31stthirty-first

Credits: English Club

أبناءه أم أبنائه أم أبناؤه؟

جاءَ أبناؤُه ، لأنَّ الأبناءَ هنا فاعلٌ (مرفوع ).
أكرمتُ أبناءَه، لأنَّ الأبناءَ هنا مفعولٌ بهِ (منصوب).
مررتُ بأبنائِهِ ، لأنَّ الأبناءَ هنا اسمٌ (مجرورٌ).

Congratulations on or for?

Several readers have written to ask which preposition should be used with congratulations. Should we say “congratulations on” or “congratulations for”?
The answer is, “It depends.”
In the singular, congratulation is the action of congratulating. In the plural, congratulations is what one offers to express pleasure in the success or good fortune of another.
The preposition on is used when expressing one’s good wishes in the context of a happy event:
Congratulations on your marriage!
Congratulations on your new baby!
Congratulations on your promotion!
Congratulations on winning the lottery!
Congratulations can be offered as praise for someone’s achievement. In that context, the preposition to use is for:
Congratulations for completing 100 days without an accident!
Congratulations for leading the Scouts to safety!
Congratulations for saving the farm from foreclosure!
Congratulations can also be offered to someone.
The CEO offered congratulations to all her employees.
The townspeople offered congratulations to the utility company for the swift restoration of power.
The word can also be used reflexively: “Go ahead and congratulate yourself. You deserve it.”
Finally, congratulations can be used by itself:
“Everyone shouted ‘Congratulations!’ as the newlyweds descended the staircase.”
Nowadays, wedding guests offer congratulations to both bride and groom, but not so very long ago, it was considered a breach of etiquette to congratulate the bride. The custom was to congratulate the groom and to offer “best wishes” to the bride. The rationale was that the groom deserved to be congratulated because he had won out over his rivals. The bride, on the other hand, received best wishes in the hope that her choice of a husband would prove to have been a wise one.

Credits: http://www.dailywritingtips.com/congratulations-on-or-for/

07 February 2014

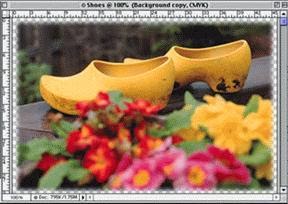
How do I make the edges of a photo fade?

How do I make the edges of a photo fade?

Vignette a photo in Adobe® Photoshop®


Make a copy of the photo file and work with the copy, not the original. Go to the File menu, choose Save as..., select TIFF for the Format:, check As a Copy, then click Save.

Copy Background layer
The Layers palette should be on the screen. Make a copy of the background layer. Either drag the background layer onto the New Layer icon in the Layers palette or select Duplicate layer... from the Layers pop-up menu


Hide the background layer
 To do this, click on the eye on the left hand side of the Layers palette next to the background layer.


Select the photo
Hold down the Command key on the Macintosh or the Control key in Windows and click on the Background layer in the layers palette or draw around the image with the Marquee tool.


Create a Border
 Go to the Select menu and drag down to Modify, then Border. Specify a width for the border. Experiment with different numbers, try 10-20 to start off. Too large a number might take too much of the photo away.


Feather the Border 
Go to the Select menu again and this time choose Feather. Choose a radius again. The program will not allow a number more than half the size of the number used for the border to be used.


A double selection border appears around the image.


Fade the Edges 
Press the Delete key on the keyboard and the edges will start to fade away. Press Delete one or two more times until the right effect is achieved. Try the Eraser tool for a slightly different effect.


Deselect the image 
Either Command-D on the Macintosh or Control-D in Windows, or go to the Select menu and choose Deselect.

Flatten the image
Choose Flatten Image from the Layers pop-up menu.  


When the message Discard hidden layers? comes up, click OK.

Save File
Save as a TIFF file.
Make sure the mode is Grayscale for black and white photos, CMYK for color.

Note: **If this image will be placed on a colored background, enlarge the canvas, and fill the area around the image with the same color as the background color. Otherwise there will be a white halo around the image on the page.


Credit: https://www.yearbooks.biz/?event=FAQ.Detail&faq=39

05 February 2014

منزل زينب خاتون


منزل زينب خاتون : يقع هذا المنزل عند زاوية تقاطع زقاق العينى مع شارع الازهر ، وهو بالتحديد يقع خلف جامع الازهر . تم بناؤه عام 1486م، في عصر المماليك، على يد الأميرة « شقراء هانم « حفيدة السلطان الناصر حسن بن قلاوون، وعندما بدأ الحكم العثماني لمصر توافد على البيت عدد من السكان كانت آخرهم زينب خاتون، وبعد وفاتها آل البيت إلى الأوقاف المصرية التي أجرته للعديدين منهم قائد بريطاني في زمن الاحتلال. ويذكر في التاريخ دور زينب خاتون في النضال ضد الاحتلال الفرنسي عام 1798م حيث كانت تؤوي الفدائيين والجرحى الذين يلجأون إلى البيت أثناء مطاردة الفرنسين لهم، فقد عثر على بعض جثث للجرحى في سرداب تحت المنزل. يبدأ المنزل بـ «المدخل المنكسر» وهو لا يتيح للداخل رؤية من بالمنزل ثم صحن المنزل، ويحوي الطابق الأول «مندرة» لاستقبال الضيوف من الرجال، واسطبل الخيل، والمزيرة «لحفظ المياه والمطبخ والطاحونة ومخزن الغلال، أما الطابق الثاني فيه مقعد الرجال (السلاملك) وهو عبارة عن شرفة واسعة تطل على صحن الدار، ومقعد الحريم (الحرملك) وهو أكثر رحابة واتساع، وينقسم الحمام في المنزل لثلاث أقسام: الحمام نفسه، غرفة التدليك وبها ملحق صغير للاستراحة وغرفة اللبس، ِأما غرفة الأميرة في الطابق الثالث فتتميز بزجاجها الملون متقن الصنع الذي يضيء الغرفة بألوان مختلفة حين يسقط ضوء الشمس عليه. ويميز المنزل بصفة عامة القباب التي تعمل على توزيع التهوية في المنزل، وبالمشربيات التي تتميز بها العمارة الإسلامية المنزلية، وبالزجاج الملون الذي يشيع جو من الجمال في المكان.

04 February 2014

How To Colorize Black and White Vintage Photographs in Photoshop

Ever wanted to add color to your old, vintage, or historical photographs? Load up some old pictures and see how color can be added quickly to any black and white photograph in this simple Photoshop how to.
While many purists simply don’t like the look of colorized black and white photographs, the ability to add color to black and white images is as indispensible as it is simple. Read on to see just how easy it can be.

Starting with Grayscale Images


Simply because an image is in black and white doesn’t mean that it is a Grayscale image. Once your photograph is open, our first task is checking our Color Mode.

Navigate to Image > Mode > RGB color to set your image to RGB. If it is in Grayscale or some other color mode, Photoshop will convert it for you. Once this is done, you’ll be ready to add color to your image.

Using Blending Modes to Add Color


One of the simplest ways to add color to a black and white image is using Blending Modes. But rather than create a dozen layers with individual blending modes, we will create a single layer group with a group blending mode. Here’s how to do it:
  • Press to create a New Layer.
  • With that New Layer selected, press to group your new layer.
  • Select your new layer group as shown above, and set your Blending Mode to “Color.”


You’ll find Blending Modes in the pulldown tab directly under the top of the “Layers” panel. Click to pull it down to set the blending mode of your Group to “Color” as shown above.


Once your group is set to blending mode “Color” reselect your layer and let’s check out some ways to add color to our image.

Some Ways to Add Colors to Your Image without Painting


You can now add color into any layer you make inside your new group. The question is, how? Any way you can add color to layers is a way that will work. Let’s start with a simple and quicker, but rougher method using the Lasso Tool or even the Pen Tool, if you feel like you’ve mastered it.


The Lasso and the Pen Tool both do roughly the same thing in this situation. You’ll be drawing and outlining shapes, and then filling them with the Bucket Fill or by going to Edit > Fill and using your foreground color. While this method does not give the most refined of results, it can be the fastest. If you wish to take a more hands-on, controlled approach, you’ll want to keep reading to see the “painting” method using the Photoshop Brush tool.

Using the Brush Tool to Paint Color into Photographs


If you’re not there, return to the group you set to Blending Mode “Color.” Navigate to the blank layer you made there and select the Brush Tool in your toolbar.


Press to select the Brush Tool, then right-click in your image to bring up the Brush Tool contextual menu. Select “Soft Round” as shown.


Click the Foreground Color area of your toolbar (as shown above left) to bring up the Color Picker. Stick with colors much duller than you want your image to look like, as they’ll brighten up considerably when they’re painted on.


Simply mouse over the areas of your image you want to be that color. Be as precise as possible, but feel free to use the eraser tool as needed.


You may find that your color, even though it is dull, appear garish. You can adjust this many different ways.


Reducing the opacity, as shown above, of your layers, can reduce the intensity of your colors and make them more naturalistic.


to add new layers whenever you want to add new colors. Keeping layers separate will give you greater control. And since they are contained within the same group, you’ll find they all conform to the same “Color” blending mode.


Zoom in to add details as needed. Minor details, such as the right color of blue in the eyes, can really bring a colorized image to life.

Improve Garish Colors with the Hue/Saturation Tool


It can be all to easy to start working with a color that seems like it’ll be the right shade, only to turn out too bright, garrish or ugly. Here’s how to adjust it and continue painting.


Paint or find a sample of the color you want to change to better suit your image.


Press to bring up the  Hue/Saturation tool.


Adjust Hue, Saturation, and Lightness values until your color suits your image. As you can see above, the garish red has transformed to a more appropriate reddish brown.


Alt + Click on the in your layers panel, beside your active layer inorder to hide all the other layers. Then press the to select the Eyedropper tool. Click your painted swatch once to select the changed color as your foreground color.


Alt + Click the same again to turn all the layers back on. Shortcut key will give you back the Brush Tool and allow you to return to painting like normal. Add as many or as few colors as you feel your image needs, in all the details you care to put in.


And with minimal work and time invested, a black and white image is now full of rich color. Practice with the brush tool, as it is likely the best method for achieving excellent results in colorizing black and white photographs.

--

29 January 2014

أوقاف مصر محمد علي باشا في اليونان

 صورة للملك أحمد فؤاد الثاني ونجله الأمير محمد علي في بيت الجد الأكبر محمد علي باشا في اليونان
 
المغفور له - بإذن الله - محمد على باشا الكبير قام بوقفها لصالح مصر فقد خصص جزءا كبيرا من ممتلكاته على سبيل الوقف الخيرى لصالح مصر، ومازالت عوائد هذا الوقف الموجود فى دولة اليونان تدخل خزانة الدولة، وأول هذه الممتلكات الوقف الموجود فى جزيرة "قولة" اليونانية ويعرف بـــ"وقف قولة الخيرى"، ولمحمد على باشا الذى حكم مصر فى الفترة من 1805 إلى 1848 ـ منزل كبير فى هذه الجزيرة، مبنى على الطراز العثمانى عام 1720م، وأصبح الآن مطمعاً نظرا لأثريته ومكانه المميز.
 
إضافة إلى هذا المنزل، فأوقاف محمد على باشا التى خصصها لمصر يبلغ عددها 17 وقفا عبارة عن أراض فضاء وأراض زراعية وقصر "الأميريت" وبعضها مؤجر، والأراضى الزراعية يتم تحديد إيجارها كل ثلاث سنوات، وهى مساحة 45 ألف متر، عبارة عن مزرعة زيتون بها معصرة ويتم تجديد قصر الأميريت عن طريق مستثمرة يونانية اسمها أنا موسيليان، التى انفقت 7 ملايين يورو على تجديده وإعادة تأهيله، واستأجرته لمدة 49 سنة طبقا للقانون، وهناك بعض المنازل الأخرى المؤجرة فى اليونان جزء من أوقافنا التى تعود لمحمد على باشا مسجلة بالشهر العقارى اليونانى، وباقى المساحة يتم مسحها جيولوجيا وبالتصوير الجوى بالأقمار الصناعية، وقد تعاقدت الحكومة المصرية مع شركة يونانية قانونية لكى تدير هذه الأوقاف لصالحنا، حيث دأب وفد من وزارة الأوقاف المصرية على السفر سنويا لتحصيل الأجرة .
واحد يسألنى :- طيب ليه يسافروا وفيه إختراع اسمه تحويلات بنكية
أقوله :- لأ ... أصل دى إسمها الحسنة المخفية